
INTEGRATE GPS DATA
- 00.00: settings - teams - integrations
- 00.19: user guide article to set the GPS integration (https://support.iterpro.com/en/guide/whats-needed-to-integrate-my-gps-data)
DEFINE THE DEFAULT METRICS
- 00.03: access the default metrics
- 00.16: how to create calculations for the default metrics
- 01.06: additional suggestions
DEFINE THE ACTIVE METRICS
- 00.16: access performance metrics
- 00.34: activate performance metrics
FEATURE DESCRIPTION
Integrating GPS Data
Before diving into the performance department, it is essential to set up the GPS integration. To do this, navigate to Settings > Team > Integration. Here, for the selected team, you can configure the GPS integration.
API integration
At the moment, the user can import GPS data by API with the following providers:
- STATSport
- Catapult
- GPEXE
- Wimu
To set up such integrations, the user needs to reach out to the Customer Success team. Below is the info requested for each provider, but a call with an expert is always suggested, to avoid misunderstanding:
STATSPORT
|
Sonra Third Party Id |
This needs to be generated by the user on the STATSport software. |
|
Main Training Split Name |
The label used to name ALL the trainings (e.g. "Full Training" or "Session"). |
|
Main Game Split Name |
The label used to name ALL the games (e.g. "Full game" or "Game"). |
CATAPULT
|
Token |
This needs to be generated by the user on the Catapult software. |
|
Team Name |
The team name displayed in the catapult software. |
|
Game Category Name |
The tag used for game sessions. |
GPEXE
|
Server Address |
The link used to access the GPEXE software. |
|
|
Email address to login into the GPEXE software. |
|
Password |
Password to login into the GPEXE software. |
|
Template |
The ID of the templated with all the metrics that need to be imported. |
|
Gpexe Team Id |
This can be extracted only when the server is up and ready. It's in the web URL when the user goes to Settings - team - Select the team. E.g.: https://e15-ui.gpexe.com/teams/392?tab=athletes |
|
Father Training categories: |
The list of trainings father categories. E.g.: Full Training, Rehab, Return to Play. |
|
Father Game categories |
The list of games father categories. E.g: Friendly Match, Official Match. |
|
Father/Son categories |
The list of the father categories with the linked son categories. E.g.: Full Training:Full Training Exercise, Rehab:Rehab Exercise, Official Match:Official Match Exercises. |
WIMU
|
Username |
The username of the user. |
|
Password |
The password for the API, not the web platform one. |
|
WimuID |
Optional, if they can ask Wimu directly |
Once the Customer Success team collects all the information and sets the integration, will test the import and confirm you everything is working fine.
CVS integration
Unlike the API, the CSV integration can be done directly by the user. You need to go on Settings section (Team - Integration - Third parties). Anyway, we always suggest contacting the Customer Success team for any support.
Let's go step by step:
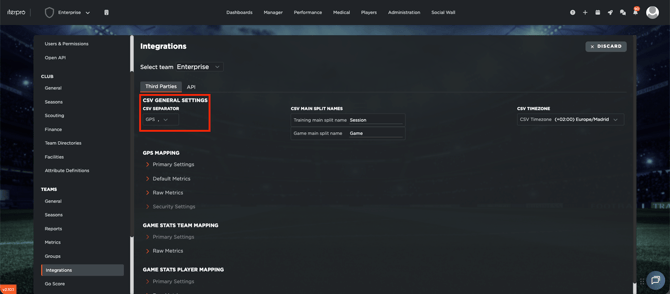
- Define the CSV Separator - The CSV Separator is the method by which each column is separated within the CSV that you are importing onto the Iterpro Software. The most commonly used is the "comma", but it may change according to the settings of your provider. If you don't know which is your separator, open the CSV as a text and you will see it immediately. Below is an example with "comma":
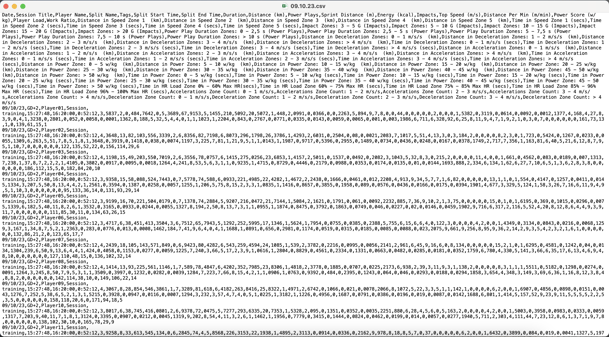
Once you click on EDIT, select teh separator from the dropdown menù:
- Training Main Split Name - The Training Main Split Name is the name given to the training session main split. For example, could be "Session", "Full training" or "Full session". In other words, is the split that contains all the data of the session (differently from the drills split). You need to type in the specific field the label that you will use in all your training, so that the platform can map the data of the entire session. Note that capital and small letters are important.
- Game Main Split Name - The Game Main Split Name is the name given to the game session main split. For example, could be "Game", "Full game" or "Full match". In this case is the split with the data of the entire match. Also here, you need to type in the specific field the label that you will use in all your training, so that the platform can map the data of the entire game. Note that capital and small letters are important.
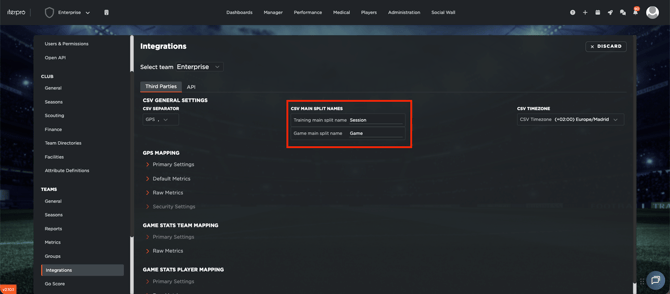
- CSV Timezone - The CSV Timezone allows you to select the timezone in which the data is set.
Once all such info has been selected, the user can directly upload his/her new template and set the new sample:
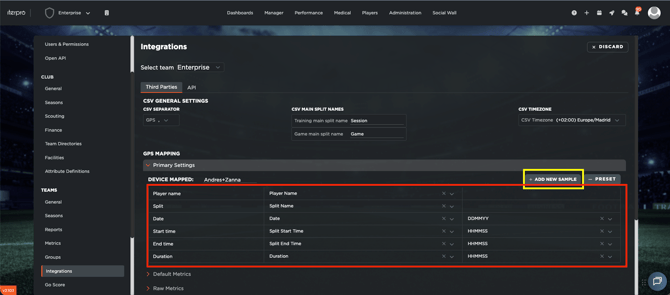
- Primary Settings (We always suggest not using any preset template to map your GPS provider CSV, considering that the clients now may edit their file template easily) - Upload the new sample and select the mandatory fields requested.
Note that:
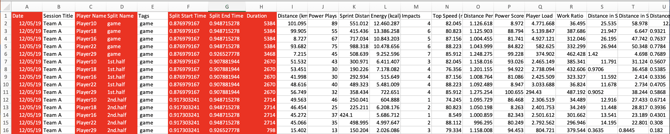
- The name of the columns in your CSV file may change, the important factors to keep in mind are that:
- The date contains the date of the session/drill,
- The player name contains the player display name (in that case, note that must be exactly the same in Iterpro and in the CSV, to let the system map it in the right way),
- Split name contains the name of the split. Remember that there must be always one unique main split (or the training one or the game one),
- Split start time contains when the selected split starts,
- Split end time contains when the selected split ends,
- Duration contains the total time of the selected split.
- The format selected needs to be aligned with the one you have in the CSV (e.g. Split start time: 10:46:37 --> HH:MM:SS)
- It's important to set the type and format for each metric, belo the accordion RAW METRICS.
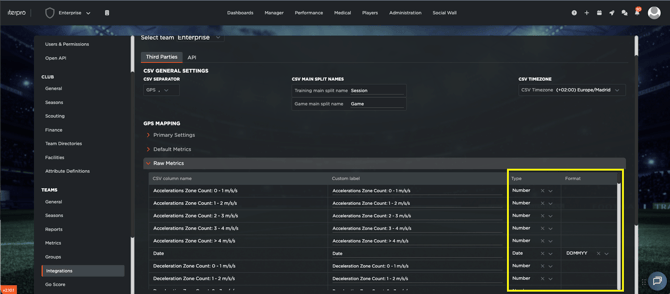
Below you find an example of what the CSV file should look like as well as the data needed to successfully import all the necessary data.
Once you click on SAVE, you are now able to import GPS data with CSV. You can find more details about how to do it in this article.
Defining Default Metrics
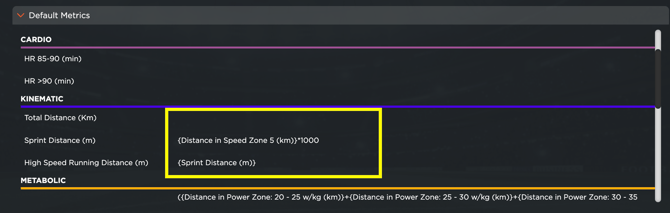
Once the integration is set up, the next step is to define the default metrics. These are custom metrics that users can configure based on their needs. Again in Settings > Team > Integration > Default metrics:
- Click on Edit.
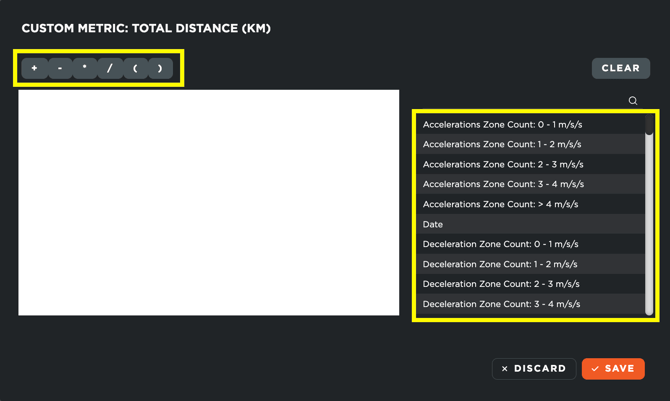
- Click in the space beside the metric names to open the box for the calculation.
- On the right side, you will find a list of available metrics. Double-click on a metric to add it to your custom selection.
- Perform the necessary calculations.
- Click Save to confirm your changes.
- To delete an existing calculation, click Clear and then Save.
The system automatically fills in certain metrics, such as Workload Score, RPE, and RPE Training Load. These should not be modified manually and the field must be empty.
Below, you can find a list of the default metrics, with the most used applications:
Perceived Metrics
- RPE: Rate of Perceived Exertion.
- RPE TL: RPE Training Load.
Cardiovascular Metrics
- HR 85-90 (min): Time spent (in minutes) between 85% and 90% of maximum heart rate.
- HR >90 (min): Time spent (in minutes) above 90% of maximum heart rate.
Kinematic Metrics
- Total Distance (km): Total distance covered.
- High-Speed Running Distance (m): Distance covered at speeds above 19.8 km/h.
- Sprint Distance (m): Distance covered at speeds above 25.2 km/h.
Metabolic Metrics
- Power Distance (m): Distance covered at a power above 20 watts/kg.
- High Power Distance (m): Distance covered at a power above 25 watts/kg.
- Power Plays (n): Number of actions exceeding 25 watts/kg.
Mechanical Metrics
- High-Intensity Accelerations (n): Number of accelerations above 3 m/s².
- High-Intensity Decelerations (n): Number of decelerations below -3 m/s².
- Explosive Distance (m): Distance covered at high power but low speed (High Power Distance – High-Speed Running Distance).
Intensity Metrics
- AVG Metabolic Power: Average metabolic power.
- Distance per Minute: Distance covered per minute.
Activating Performance Metrics
Once your GPS provider is set up and your default metrics are saved, you can proceed to activate the performance metrics.
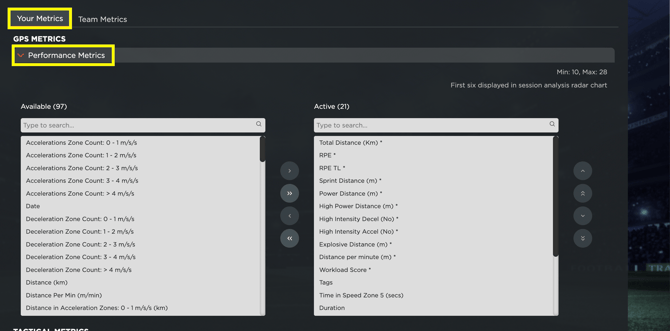
- Navigate to Preferences > Teams > Metrics and open the Your Metrics tab.
- Click Edit to access the performance metrics.
- On the left, you will see all available system metrics. These include both the metrics provided by your GPS provider and Iterpro’s default metrics (marked with an asterisk).
- To activate a metric, select it and move it to the right box, which contains all active metrics. These will be displayed in your session analysis screens.
- Click Save to confirm your selection.
By following these steps, you will ensure that your GPS data is correctly integrated, your custom metrics are defined, and your active performance metrics are set up for analysis.